Wednesday, November 30, 2011

Sweet Treats

Our family's favorite treat for a winter's evening is homemade popcorn and hot cocoa. I'll be honest, it's easier to convince myself to bundle everyone up in their snowsuits to play outside if there is the promise of warming up with hot cocoa after we come back in. It is also traditional holiday tree trimming fare.

Got Dairy Free Cocoa?

Church Mouse's Homemade Hot Cocoa Mix


Here's a recipe for a yummy and thrifty hot cocoa mix. You can make this in bulk to use with your family or to give away as a gift in a quart size mason jar with a ribbon on it.
  • 8 c. powdered dry milk
  • scant 3/4 c. cocoa powder
  • 2 1/2 c. sugar
  • 1/4 tsp. salt
Add 1/3 c. mix to 1 c. hot water and enjoy!

If you don't want to bother with making up a mix ahead of time, the easiest and best homemade cocoa is just 1 tablespoon of cocoa powder and 1 tablespoon of sugar in a mug. Add about 1 c. hot milk or for a dairy free version, hot soy/rice/coconut milk. (I prefer the coconut. I would advise using less sugar with the pre-sweetened milks.) Add a dash of cinnamon if it suits your fancy. Easy to remember, easy to make!
(Thanks to my friend, Stacey, for the suggestion!)

Now for the POPCORN!

Have you been making your popcorn in the microwave all these years? There is a better way!!! It is substantially cheaper to buy your popcorn in bulk and pop it on the stove. You really don't need to buy a fancy popcorn popper. We have tried several and while they do work well, they are usually very annoying to clean and they burn out after a few years of heavy use. We now use our big stock pot, the very same one that we use to make soup, iced tea, and any number of things. I'm happy to get rid of a bulky kitchen gadget in favor of using something as multipurpose as a good stock pot. Plus, the stockpot washes out so easily! Reducing dirty dishes is always a win in my book!

Popping Corn on the Stove, Step By Step:


1. Put a couple of tablespoons of oil in your pot and add two popcorn kernels. Use enough oil to cover the entire bottom of the pot. (We usually make a big batch in our stock pot, but you can make a small batch using a smaller saucepan just as well.) Turn your burner to medium-high heat.

Popcorn 1

2. When one of the popcorn kernels pops, add enough popcorn to cover the bottom of your pot, plus just a little bit more. Cover with a lid.

Popcorn 2

3. Shake the pot to evenly coat the kernels - just slide it back and forth on the stove a bit.

Popcorn 3

4. When the kernels start popping, continue shaking the pot to mix the kernels and to keep the popped pieces from burning. Vent out some of the steam by slightly lifting the lid if needed.

Popcorn 4

5. When the popping stops, pour the popped corn into a large bowl. Put the pot back on the stove and add your butter to the pot to melt it. Drizzle the melted butter on top of your popped corn and add seasonings to taste.

Popcorn 5

You can adjust this to your tastes, but these ratios are a good rule of thumb:
1 Tbs. oil + 1/3 c. popcorn kernels + 1 Tbs. butter

You can use any kind of oil, but our favorite is Nutiva coconut oil. Amazon runs amazing deals from time to time, and it is our top choice for healthy cooking oils.

Our favorite seasonings:
I definitely recommend popcorn salt. It is ground super fine so it sticks to the kernels.

** Note - I am not a Penzey's affiliate and I do not receive any compensation for my recommendation. I just love their spices so much that I wish everyone could enjoy them as we do.


What is your favorite popcorn flavor?

Pin It

Sunday, November 27, 2011

"How Sweet, How Heavenly"

Sunday Hymn Post

How sweet, how heavenly is the sight,
When those that love the Lord
In one another’s peace delight,
And so fulfill His Word!

When each can feel his brother’s sigh
And with him bear a part!
When sorrow flows from eye to eye,
And joy from heart to heart!

When, free from envy, scorn, and pride,
Our wishes all above,
Each can his brother’s failings hide,
And show a brother’s love!

When love, in one delightful stream,
Through every bosom flows,
When union sweet, and dear esteem,
In every action glows.

Love is the golden chain that binds
The happy souls above;
And he’s an heir of Heaven who finds
His bosom glow with love.

by Joseph Swain


John 13:34-35

A new commandment I give to you, that you love one another; as I have loved you, that you also love one another. By this all will know that you are My disciples, if you have love for one another.


Pin It

Friday, November 25, 2011

Moving into the State of Contentment


Hebrews 13:5 - Make sure that your character is free from the love of money, being content with what you have


Continual Feast

Philippians 4:11 - For I have learned to be content in whatever circumstances I am.

Disclaimer: This is rather individualistic, so I write to share my own struggle, not to criticize those who may not share my thoughts. Personally, most of my gifts are homemade and what I do buy, I buy throughout the year so I can avoid shopping as much as possible this time of year. So if you are one of those "shop 'til you drop folks"... by all means enjoy and give the glory to God.

Thanksgiving is my favorite holiday. I love the warm, homey atmosphere of food, family, and joy and I love that the day remains rather noncommercial. I love simple traditions and I am not one to go all out with decorations and fuss. But I feel oppressed. Is it just me, or is the intensity of the shopping mania that is "Black Friday" reaching a whole new level? It goes beyond just one day. Stores are competing to open earlier and earlier with bigger sales, and now you can even start your Black Friday shopping on the evening of Thanksgiving at 10 pm! We've been inundated with glitzy sales fliers in our mailbox for weeks. No longer limited to "Cyber Monday", the internet is teeming with sales all week long as evidenced by my e-mail inbox and the advertising on the blogs I follow. I love a good deal as much as the next person. But this is too much. I am finding it oppressive. The hunt for a good deal is turning into a case of "stuffitis", that suffocating disease that chokes out my peace, joy and contentment. I feel it encroaching on Thanksgiving, and not just the holiday we celebrate, but upon the day-to-day giving of thanks.

I do not need more stuff.

I really, really, really don't need more stuff. Stuff can be nice, but stuff also means more things to clean and maintain. I am making the conscious choice, giving myself the gift, of moving into the state of contentment. We have already been in the process of downsizing, but now I am giving myself permission to toss all sales fliers directly into the recycling bin, delete all blogs in my feed or e-mails in my box no matter how tempting the sales. Instead, I will turn on my peaceful music and focus on the joys of the season with my family... making, doing, just BEING together.

In the state of contentment, there is peace, clarity, and serenity. God gives us everything we need.

1 Timothy 6:6-10
But godliness is a means of great gain when accompanied by contentment. For we have brought nothing into the world, so we cannot take anything out of it either. If we have food and covering, with these we shall be content. But those who want to get rich fall into temptation and a snare and many foolish and harmful desires which plunge men into ruin and destruction. For the love of money is a root of all sorts of evil, and some by longing for it have wandered away from the faith and pierced themselves with many griefs.
Ann Voskamp says it simply, but well, "turn the carols up louder and remember all His gifts — And happily become the gift!"

Pin It


Thursday, November 24, 2011

Hymn of Thanksgiving

Photobucket

Be Present At Our Table, Lord

by Louis Bour­geois

Be present at our table, Lord;
Be here and everywhere adored;
Thy creatures bless, and grant that we
May feast in paradise with Thee.

We thank Thee, Lord, for this our food,
For life and health and every good;
By Thine own hand may we be fed;
Give us each day our daily bread.

We thank Thee, Lord, for this our good,
But more because of Jesus’ blood;
Let manna to our souls be giv’n,
The Bread of Life sent down from Heav’n.

My prayer is that you will be surrounded by family and loved ones, but more so by the love of our Savior. May your day be blessed!

~ CM

Pin It

Sunday, November 20, 2011

"He Leadeth Me"

Sunday Hymn Post

He leadeth me, O blessèd thought!
O words with heav’nly comfort fraught!
Whate’er I do, where’er I be
Still ’tis God’s hand that leadeth me.

Sometimes mid scenes of deepest gloom,
Sometimes where Eden’s bowers bloom,
By waters still, over troubled sea,
Still ’tis His hand that leadeth me.

Lord, I would place my hand in Thine,
Nor ever murmur nor repine;
Content, whatever lot I see,
Since ’tis my God that leadeth me.

And when my task on earth is done,
When by Thy grace the vict’ry’s won,
E’en death’s cold wave I will not flee,
Since God through Jordan leadeth me.

Refrain -

He leadeth me, He leadeth me,
By His own hand He leadeth me;
His faithful follower I would be,
For by His hand He leadeth me.

by Joseph Gilmore

Pin It

Saturday, November 19, 2011

Escarole Soup

It's Potluck Saturday!

This recipe is healthy, simple, and very delicious! It's a terrific way to eat your greens!

escarole soup 1

1 medium onion, chopped
1 small head of escarole (about 1/2 lb. You will find it near the lettuce in the produce aisle.)
2 large carrots, grated
10 cups chicken stock, preferably homemade (I sometimes use half veggie stock)
6 oz. tiny pasta shapes - I like stelline (the tiny stars) though ditalini is easier to find
Freshly grated Parmigiano-Reggiano cheese

1 lb. Meatballs - I keep these made up in the freezer, though you can also buy the ready-made ones.

Preparation:
Saute your chopped onion in some olive oil in a large pot. Cook until the onions begin to brown.

Meanwhile, trim the escarole and discard any wilted or bruised leaves. Cut off the stem ends. Separate the leaves and wash well in cool water, especially the center of the leaves where soil collects. Stack the leaves and cut them crosswise into 1-inch strips (like a large chiffonade). You should have about 4 cups.

escarole

When the onions are ready, combine the escarole, carrots, and stock in a large pot. Bring to a simmer and cook until the escarole is almost tender, about 30 minutes.

escarole soup 2

When the escarole is almost tender, stir in the pasta and return the soup to the simmer. Drop the meatballs into the soup. Cook over low heat, stirring gently, until the meatballs and pasta are cooked, about 20 minutes. Taste for seasoning. Serve hot with grated Parmigiano-Reggiano.

Serves 8

escarole soup 3

Variation: To make a gluten free version, substitute a can or two of cannelini beans for the pasta. (You will want to make sure you make gluten free meatballs as well.) You can also substitute the beans for the meatballs if you want a meatless version, but I gotta tell you... the meatballs make the soup!

Pin It

Thursday, November 17, 2011

Photobucket

Psalm 44:8 - "In God have we made our boast all the day long, And we will give thanks unto thy name for ever."

I was struck by this passage today. Do I indeed boast about God all day long? Do I speak His name when I tell of all of the blessings He gives? I think I need to be not only more thankful, but more outspoken when it comes to naming the One "from whom all blessings flow".

Today, I am thankful that Preacher Man tells me that I am beautiful. I'm inclined to quickly shrug it off when he says that, but today, I tried to take the moment to revel in the thought and be thankful in the blessing. I am loved and I am blessed. For this, I am undeserving, but I am still deeply thankful.

Pin It

Saturday, November 12, 2011

Homemade Pie Crust

Photobucket


Beautiful, flaky pie crust is an art. Like any great art, you will perfect your skills over time. This means, to get really good, you will need to practice making a lot of pies! (= Happy Husband!!) As a new bride, I spent about a year making pies for every occasion, so after a few dozen, I finally perfected pie crust!

BUT, practice does not always make perfect! If you practice making pie crust with a bad recipe and poor techniques, you may still not have success. Perfect practice makes perfect, and my tried and true recipe and tips should help you achieve pie crust success. One unique thing about my recipe is the Paste Technique. Your dough will mix together much more easily, reducing how much you work the dough, and this will make your crust more tender.

Second, work with COLD ingredients for the best results. You don't want your dough to just mush together like cookie dough, you want the butter to be cut in and just blended, leaving nice little flaky butter globs. If you are an accomplished biscuit maker, the technique is quite similar!

Here is a condensed recipe, so if you are already skilled with pastry, you can just look at the short version:

Church Mouse's Pie Crust
(makes two 9" pie crusts)
3 c. flour
1 tsp. salt
1 1/3 c. butter
6 Tbs. ice water
1 egg, slightly beaten
1 tsp. vinegar

Mix 2 1/2 c. flour and salt together. Dice the butter into small chunks and toss them into the flour mixture. Using a pastry cutter, cut in the butter until fluffy. In a separate bowl, mix 1/2 c. flour with the ice water, beaten egg, and vinegar to make a paste. Add this paste to the flour/butter mix and lightly combine - I always finish it off with my hands. If it feels to dry, you can add more water a teaspoon at a time. Roll into a ball and halve it. Wrap the halves in plastic wrap & refrigerate for about 20 minutes. (Pie crust may also be frozen at this point.) Roll out - makes two crusts (top and bottom).

Continue reading for more detailed instructions and tips.

Photobucket

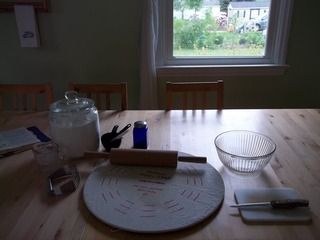
Gather your supplies:
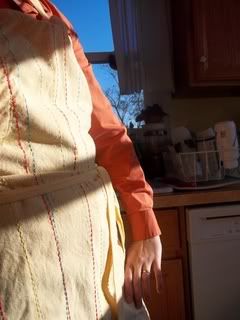
  • An apron is an absolute necessity in my opinion. ;)
Apron

One of the major obstacles for pie crust success is not having the right tools. These specialty tools will make your work much, much easier and will give more consistent results.
A pie board creates a non-stick surface where you roll out the dough. Basically, it's just a lightweight piece of particle board in a circular shape. It has rubber knobs on the underside so it doesn't slide off the counter, and there is a piece of thick muslin that stretches over the board and cinches up around the edge. It would be pretty simple to make one. Flour the muslin on the board heavily. If you don't have a pie board, you can use a clean wooden table or counter top, floured heavily. You may still have issues with sticking though. I find a real wood surface that doesn't have a lacquer or polyurethane finish works the best next to the pie board.
Use a nice wooden rolling pin - the supposedly non-stick ones do not work AT ALL! Better yet, a rolling pin with a "sock" that cinches over it - flour it well and your rolling pin will never stick 
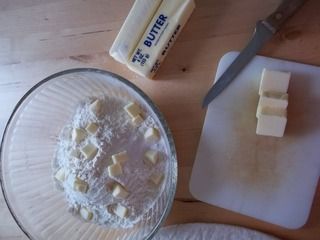
Don't overwork the dough!! Use a pastry cutter, mix just until fluffy. The pieces of butter should be about the size of peas.
Pies tend to need about an hour to bake in the oven just so the middle is set, but the long baking time can burn the edges of the crust. A re-usable pie shield will protect your crust from burning and will be much easier than fiddling with strips of foil.

Photobucket

Ingredients:
BUTTER - I use real butter in my pie crust. Personally, I avoid hydrogenated anything, so butter is the way to go. Some people use lard or shortening and it can be substituted 1:1 in this recipe if that is your choice.

FLOUR - I do much of my baking with whole wheat flour, but I do NOT recommend it for pie crust. Get a good unbleached white flour for the best results with your crust. It's not as healthy, but it's PIE, you know?!

Freezing Pie Crust:
It's handy to make up your pie crust ahead of time, especially when doing lots of holiday cooking. After you have your dough mixed and in two balls, you can flatten them slightly, wrap carefully in plastic wrap, and then seal in a ziploc freezer bag. Thaw completely before rolling it out, but do so in the fridge so it stays cold.

Photobucket

Technique for Rolling Out the Crust:
Rolling pie crust works best with light pressure and it helps to flip the crust over frequently as you roll. If the crust begins to stick to the rolling pin or your pie board, sprinkle some more flour on the surface before you keep rolling. When you roll out the bottom crust, make it just a bit larger than your pie plate so it hangs slightly over the edges. (Can you see the light yellow smudges of butter in there? That is the way it ought to look.) Gently transfer your crust from the pie board to the pan, using your hands or by laying it across the rolling pin. Center it and gently shape the sides so they are flush against the pie pan.

Trimming, Filling, and Topping Your Pie:

Your recipe should tell you the best way to fix up the crust. For example, if you are making a pumpkin or pecan pie, you will only need the bottom crust, so you can just trim and flute the edges right now. With a sharp knife, gently cut around the outside of the pie pan to trim the edges of the crust. (You don't want to cut off too much because the crust will shrink a bit as it bakes.) You can flute the edges with your fingers, scallop them with a teaspoon, mark them with fork tines, or use any other creative technique you come up with. If you want to make the middle of the pie pretty, you can use a cookie cutter to cut a shape or two out of the scraps of the crust to lay on top. (When adding shapes to a pumpkin pie, bake it until it is set, add the shapes to the top, and continue baking.)

Rolling out a top crust:
First, trim the edges for your bottom crust. With a sharp knife, gently cut around the outside of the pie pan. (You don't want to cut off too much because the crust will shrink a bit as it bakes.) Roll out a circle slightly larger than your pie pan. Gently transfer your crust from the pie board to the pan, using your hands or by laying it across the rolling pin. Center it on your pie and trim the edges for the top crust, cutting the top crust so that it is about 1 cm larger than the bottom crust all the way around. Fold the edge of the top crust over the edge of the bottom, sandwiching the bottom crust inside the folded over top crust. (Wish I had a picture of this, but I hope that description makes sense!) Gently press the edges together all the way around to seal them and then flute them, mark with fork tines, etc... If you are making a berry pie, you will probably need to vent it by cutting some slits in the top, and if you have one, use a pie bird. A pie bird will prevent the juices from bubbling over. Sprinkling some sugar or cinnamon/sugar on top is a nice touch. You can also do cookie cutter cut-outs on the top crust if you want to get really fancy.

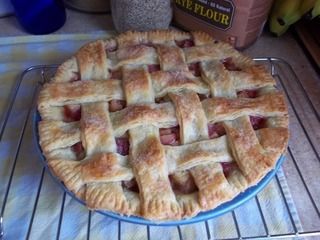
Making a lattice top:
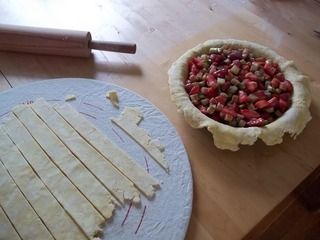
A lattice top looks pretty with a fruit pie - especially cherry, apple or rhubarb. When I plan to make a lattice top, I leave the edges of the bottom crust hanging over the edge and do not trim them until the top is on.

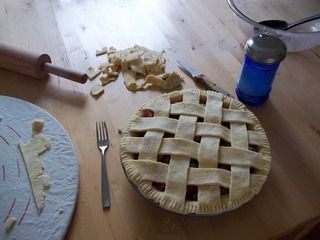
To make a lattice, simple roll out your circle a little larger than your pie pan and cut the circle into long strips. To weave the lattice, I lay the longest two pieces down the middle first. I take the next two longest pieces and lay them perpendicular to the first two, gently lifting and tucking the strips over and under when they need to be for a neat basket weave. Weave in a final strip on each of the four sides and let the edges drape over the pie pan.

Photobucket

With a sharp knife, gently cut around the outside of the pie pan to trim the edges of the crust. (You don't want to cut off too much because the crust will shrink a bit as it bakes.) Gently press the lattice into the bottom crust dough smoothing it together. To seal the crusts together, you can make a fluted edge or as I show below, just a simple edge with the tines of a fork.

Now you should be ready to bake!

Photobucket


Pin It

Apple & Pumpkin Muffins

It's Potluck Saturday!!!

Apple & Pumpkin Muffins

This is one of those recipes that I have tweaked beyond recognition, so I feel entitled to claim it as my own. These are YUMMY and rather healthy as muffins go, so slather on the butter, and enjoy a delicious, seasonal treat!

Apple & Pumpkin Muffins

3 c. whole wheat flour
1 c. brown sugar
1 tsp. ginger
1 tsp. cinnamon
1/2 tsp. cloves
1/2 tsp. nutmeg
1 1/2 tsp. baking powder
1 tsp. baking soda
1 tsp. salt
4 eggs
1 tsp. vanilla
15 oz. can pumpkin puree
1/2 c. oil (I prefer coconut)
1/2 c. applesauce
1 c. honey
1 c. chopped walnuts
2 apples - peel, core & chop

Mix the dry ingredients thoroughly, then add in the wet ingredients and mix. Fold in the walnuts and apples. Prepare your muffin tins with paper liners or be generous greasing them with butter. Spoon into muffin tins. Bake at 350* for about 20 minutes. The tops should be springy when they are done. Let them cool a little bit in the pans before removing them.

*I got 2 1/2 dozen out of this recipe and I have a handy little half size tin I like to use. If you don't, make 2 dozen big ones or 3 dozen small ones.

These would be yummy cut in half with apple butter... or pumpkin butter...

*running off to eat another*

Pin It

Thursday, November 10, 2011

Cloth Diaper Tutorial 4 - Make A Pail Liner

Photobucket

Here are the details on how to make a waterproof diaper pail liner that fits in a standard, flip-top kitchen trash can. Making my own pail liners cost *at least* half the price of buying a new one similar to this. Mine turned out every bit as nice as the ones I bought over four years ago. (My old pail liners are no longer waterproof, but they make nice laundry bags!) I like to have two - one for the pail and one for the wash.

Supplies:
(Or buy half the amount of fabric to make just one. Joanne's carries this in many colors and prints. Look for their 40% off coupons for even more savings!)
  • thread to match
  • 1/4" wide elastic - you'll need a length about 24" long for each pail liner (so 4 feet total for 2 of them)
If you have never sewed with PUL before, this is a great starter project! It is very slippery and it's just plain tricky. See here for some great tips. (I did not use my walking foot, and it still turned out ok, but if I were going to do this again, I would use it because I had some issues with bunching fabric. If you don't have one, don't sweat it!)

1. Cutting it to Size:

Photobucket

With the fabric folded in half just like it came off the bolt, it was the perfect width at about 28" wide (or 56" if you unfold it). I cut the length of fabric in half, giving me two sections about 30" long.

Photobucket

Trim the extra laminate fabric from the selvages.

2. Sewing the Bottom and Side:

Photobucket

Sew the seam across the bottom of the pail liner first. As you can see, I had some significant bunching going on. Before sewing along the side, I trimmed the excess fabric. The second side is the fold, and doesn't need any sewing.

(If you want, you can turn your pail liner so the fold is along the bottom of the bag. I was a bit concerned about having a seam at the bottom of the pail, but after six+ months of use and no issues with leaking, I think it works just fine... still, up to you!)

3. Working on the Casing at the Top:

Photobucket

Before sewing the casing, I decided to do an overlock zig-zag stitch over the edge just to make things neater. PUL does not fray, so this step isn't completely necessary, but I think it looks much nicer.

Photobucket

Fold the fabric over (sticky sides together) about 3/4" and sew all the way around making a 1/2" casing. Make sure you open up the fabric at the side seam before you stitch. (See picture below.)

Photobucket

Use a seam ripper to loosen a few stitches at the side seam.

Photobucket

Safety pin one end of your length of elastic and work it through the casing until it goes all the way around. Tie a double knot to secure the elastic, even out the fabric, and tuck the knot into the casing.

Photobucket

Zig-zag stitch the casing shut.

Photobucket

Turn it right side out and you've got your first pail liner!

Other Cloth Diaper Tutorials:
1. How to Re-waterproof PUL on pocket diapers
2. How to your own Microfiber Inserts for pocket diapers
3. How to replace leg elastic

Pin It

Wednesday, November 9, 2011

Feast!

Photobucket

Looking for some recipes for your Thanksgiving Feast? Here are my favorites:

Crock Pot Dressing

Orange Cranberry Relish

Corn Pudding

Turkey Gravy

Sweet Potatoes - 3 Ways!

Ms. Clara's Dinner Rolls


Acorn Squash

Fall Green Salad

Photobucket

Tutorial on pie making.

If you are hosting this year, I recommend coming up with a timeline like this. It will help you save your sanity!

Here's a fun idea for a decoration/family activity:

thanksgiving

Have each guest trace their hands onto colored construction paper, cut them out, and list something for which they are thankful. I'm saving the ones my children make each year in an envelope.

What are some of your family traditions? Is your menu the same from year to year, or do you like trying new things?

Pin It

Heart Work

Photobucket

James 3:8-12 -
But no man can tame the tongue. It is an unruly evil, full of deadly poison. With it we bless our God and Father, and with it we curse men, who have been made in the similitude of God. Out of the same mouth proceeds blessing and cursing. My brethren these things ought not to be so. Does a spring send forth fresh water and bitter from the same opening? Can a fig tree, my brethren, bear olives, or a grapevine bear figs? Thus no spring yields both salt water and fresh.
There is so much richness in the book of James! I think I am finally beginning to understand the true meaning of verse 8, "no man can tame the tongue". I always thought that was a bit of a contradiction. If we really can't tame the tongue, then how will we become like Christ? Surely Christ was able to tame His tongue!

It has finally dawned on me that it is not the tongue that needs the work,
it is the heart
.

I can work all day long on keeping my mouth shut more often and speaking with "the law of kindness on my lips", but that will only get me so far because "no man can tame the tongue". It is not until my heart is purified that I will be a spring that sends forth sweet water and a fig tree bearing sweet fruit for the Lord.

And here I'll share another bit of wisdom I recently heard: Do you find yourself thinking, "Oh I can't believe I just said that!" Or, "Did I really just do that? It's so not like me!" If you find yourself thinking those things, you have some heart work to do. Those things don't just come out. Those things come from an ungrateful, angry heart full of discontent.

Vs. 14-18
But if you have bitter envy and self-seeking in your hearts, do not boast and lie against the truth. This wisdom does not descend from above, but is earthly, sensual, and demonic. For where envy and self-seeking exist, confusion and every evil thing is there. But the wisdom that is from above is first pure, then peaceable, gentle, willing to yield, full of mercy and good fruits, without partiality and without hypocrisy. Now the fruit of righteousness is sown in peace by those who make peace.
Yes, I definitely have some heart work to do!

James 4:7-8
Submit yourselves therefore to God. Resist the devil, and he will flee from you. Draw near to God, and he will draw near to you. Cleanse your hands, you sinners, and purify your hearts, you double-minded.
Psalm 51:10
Create in me a clean heart, O God, and renew a right spirit within me.


This is my prayer.

Pin It

Tuesday, November 8, 2011

Winterizing

snowed in brussel sprouts

Winter caught us a little off guard this year! Those are my brussel sprouts. The brussel sprouts I spent months carefully tending, picking off all of those nasty caterpillars so we could enjoy some nice fresh ones for Thanksgiving dinner... Yeah, they are in the compost pile now with not a single sprout to show for it. So sad! I'll try again next year, and hope to get them in the ground sooner, and be more vigilant about the cabbage moths.

Anyway, now that the snow has melted and we have had a couple of unseasonably warm days, it's time to do what we should have already done - winterize the house! Here's our list:

- Put up the fans and window unit ACs and bring out the humidifiers
- Put the outdoor cover on the one permanent window AC
- Dump the contents of all outdoor potted plants in the compost bin
- Completely clean out the garden, till the soil, and bring in the stakes and tomato cages
- Most years we collect bags of leaves from the neighbors and till these directly into the soil, though we are skipping that this year
- Divide perennials that need it, and otherwise tidy up the flower/herb garden
- Spread the mulch in the front that has been sitting out for several months :P
- Bring in extraneous yard stuff - garden hose, buckets, outdoor toys, etc...
- Give the car a thorough washing and waxing
- Rake leaves and fill up the compost bin
- Turn the compost before it freezes
- Set out the bird feeders and fill with seed
- Bring in the grill and outdoor furniture

Did I miss something?

Compost Bins

If you haven't build a compost bin, this is a nice time of year to do it. Collect the bags of leaves your neighbors set by the curb for some wonderfully rich compost. Preacher Man built our side-by-side bins out of pallets. He bolted three together and used a fourth leaning against the front as a door. We have one for current use and one with the previous year's compost to let it age really well before being used in the garden. The system is working really well!

It's been lovely spending a long couple of days outdoors in the sunshine. I know these days are numbered, so I'm determined to soak up the sun while it lasts!

Pin It

Friday, November 4, 2011

Painting a Peaceful Picture

Do you feel stressed? Do you need a calm and peaceful 15 minutes? Painting with watercolors is one of my favorite rainy day/"I need a break" activities to do with children. Turning on a peaceful piece of classical music and painting is food for the soul both for you and your children. My husband says his fondest memories of elementary school were when his teacher reserved a two hour block each Friday devoted to watercolor painting. There were no assignments, just free painting. We all have a deep need for expression, and watercolors can be a lovely outlet.

Buy a tray of cheap, washable watercolor paints for each child and keep them stashed with some heavy weight paper in a handy place. I recommend using shallow, wide-based containers for the water to avoid spills. If you have a toddler, you'd better have a towel handy anyway. ;) Turn on the music, and paint away!

music painting 2

May I recommend "The Lark Ascending" by Ralph Vaughan Williams? Tell your children the music is about a bird in flight and ask them to paint what they hear. It doesn't have to be a picture, just listen, feel, and paint.


Another musical activity, is to let the children spatter paint on a large staff. If they are learning to read the names of the notes on the staff, labeling them is a great exercise. If they know an instrument, they can try to play what they paint. If they are a toddler and a pre-schooler like mine, they can just enjoy "painting the music".

music painting 1

Spilled watercolors are easy to wipe up with a t-shirt rag and some vinegar in a spray bottle. Don't let the fear of mess keep you from enjoying painting with your children.

And lastly, please don't let my blogs make you feel badly about yourself. I like to share my life and what works for me, and the last thing I want to do in sharing is to stress you out! Live a righteous life to the fullest, and do so free of guilt!

Wishing you a peaceful Friday!

Pin It

Thursday, November 3, 2011

Giving Thanks

Photobucket

Better than Thanksgiving is ThanksLIVING! Don't forget to give thanks!

John 17:11-19
On the way to Jerusalem he was passing along between Samaria and Galilee. And as he entered a village, he was met by ten lepers, who stood at a distance and lifted up their voices, saying, "Jesus, Master, have mercy on us." When he saw them he said to them, "Go and show yourselves to the priests." And as they went they were cleansed. Then one of them, when he saw that he was healed, turned back, praising God with a loud voice; and he fell on his face at Jesus’ feet, giving him thanks. Now he was a Samaritan. Then Jesus answered, "Were not ten cleansed? Where are the nine? Was no one found to return and give praise to God except this foreigner?" And he said to him, "Rise and go your way; your faith has made you well."


Pin It

Wednesday, November 2, 2011

Wandering in the Wilderness of Motherhood

Photobucket

Many prominent characters in the Bible who were mighty men of God went through a period in their lives where they were isolated and alone. Is this just a coincidence? I think not. It seems that God used those times as an opportunity to test these men and increase their faith and reliance upon Him. These times of testing may very well have prepared these men for their great challenges to come.

Here are a few quick examples:
Abraham - leaving his homeland to go to a new land
Moses - spent 40 years as a shepherd in the wilderness
David - spent years in the wilderness running from Saul
John the Baptist - lived in the wilderness
Jesus - the ultimate example when he endured 40 days of temptation in the wilderness

I'm sure you can think of others.

All of these men have something else in common. The wilderness. Their time of trial and testing came in the wilderness.

Do long days at home with little ones and working to meet their continual needs feel like living in the wilderness to you? Sometimes I feel that way. Most days, I feel alone. Most days, my body is physically pushed to the limit. Most nights, my sleep is poor and interrupted. Most days, my patience is tested to the breaking point. The terrain is rough too - there is a constant battle against mounds of laundry, dishes stacked to the sky, and there are toys, shoes and socks strewn EVERYWHERE! It's a wild, wild world, I tell you! And I KNOW that I have it easier than many of you ladies out there!

Some women deal with their time of trial in the wilderness (i.e. - life with only littles) by trying to escape as often as possible with "Me time". Some women try to just plough through it as quickly as possible by having their desired number of children in a very short amount of time so they can just get it over and done with and move beyond the diaper days.

May I suggest a different way?

Allow yourself to be "saved through childbearing". (2 Timothy 3:15) USE this time of trial to work on your character, sanctify and purify yourself, and above all, make yourself more like Christ. Work every single day to continue in "faith, love, and holiness, with self-control". If we are willing to submit ourselves to God and say, "not my will, but thine", God will have an opportunity to work in us as He has never done before.

Every day that we are living life with Littles we face The Tempter head on. The Tempter tests us through bowls of oatmeal dumped on the floor, dealing with dirty diapers in the middle of your meal, asking you to jump up to fetch something for the dining table so many times that you wonder why you bother sitting to eat, and by making every square inch of each child and high chair smeared with more food than you remembered putting in their bowls!

It is written, "Man shall not live by bread alone, but by every word that proceeds from the mouth of God." (Matthew 4:4)

Another day, your baby has a fever and needs to be held non-stop, your toddler has 5 potty accidents in one day, your husband is out of town for the week, so you have to do the best you can all by yourself. You feel alone and start having a pity party for yourself. Worse, you say, "God are you even here? Do you see what I am going through?" (see Exodus 17:7)

It is written again, "You shall not tempt the Lord your God." (Matthew 4:7)

The Tempter challenges us yet again by conspiring to prevent tired and cranky children from falling asleep and getting a good nap. You have been there right? The phone rings and it is a telemarketer, next UPS delivery rings the doorbell, and finally, just as those sweet eyelids flutter finally flutter closed, the blinds fall down from the windows with a crash. Your afternoon quiet time you meant to spend with The Word is ruined. Will you put God aside for today and just spend time with the TV and Facebook?

Away with you, Satan! For it is written, "You shall worship the Lord your God, and Him only you shall serve." (Matthew 4:10)
Remind yourself, it is all about sanctification and purification. It is a part of the refining process.

James 4:7-8 -
Therefore submit to God. Resist the devil and he will flee from you. Draw near to God and He will draw near to you. Cleanse your hands, you sinners; and purify your hearts, you double-minded.
1 Thessalonians 5:16-25 -
(adaptation)
Rejoice always.
Pray without ceasing.
Give thanks in all circumstances.
Hold fast what is good.
Abstain from every form of evil.

Now may the God of peace Himself sanctify you completely, and may your whole spirit and soul and body be kept blameless at the coming of our Lord Jesus Christ.

He who calls you is faithful.

Sisters, pray for us.


Pin It

This post was inspired by a wonderful message from a very impressive young man named Dan Koen. I'm sure he did not have motherhood in mind as he spoke, but that is where my thoughts automatically went, and I wanted to share them with some other mothers out there who may be working through the same type of thoughts.
Related Posts Plugin for WordPress, Blogger...